本文最后更新于:June 30, 2023 pm
本文作者:[wangwenhai] # 概要:本文主要讲EMQX插件开发入门基础

1. EMQX简介
EMQ X Broker 是基于高并发的 Erlang/OTP 语言平台开发,支持百万级连接和分布式集群架构,发布订阅模式的开源 MQTT 消息服务器。
EMQ X Broker 在全球物联网市场广泛应用。无论是产品原型设计、物联网创业公司、还是大规模的商业部署,EMQ X Broker 都支持开源免费使用。
因为EMQX是开源的,所以我们可以自由下载源码进行二次开发,同时EMQ支持插件扩展,极大的方便了我们自己定制化开发EMQX。
2. 插件介绍
EMQX内置了很多常见的插件,比如Mysql认证,MongoDb认证,Redis认证等等:
| 插件 | 配置文件 | 说明 |
|---|---|---|
| emqx_dashboard | etc/plugins/emqx_dashbord.conf | Web 控制台插件(默认加载) |
| emqx_management | etc/plugins/emqx_management.conf | HTTP API 与 CLI 管理插件 |
| emqx_auth_clientid | etc/plugins/emqx_auth_clientid.conf | ClientId 认证插件 |
| emqx_auth_username | etc/plugins/emqx_auth_username.conf | 用户名、密码认证插件 |
| emqx_auth_jwt | etc/plugins/emqx_auth_jwt.conf | JWT 认证/访问控制 |
| emqx_auth_ldap | etc/plugins/emqx_auth_ldap.conf | LDAP 认证/访问控制 |
| emqx_auth_http | etc/plugins/emqx_auth_http.conf | HTTP 认证/访问控制 |
| emqx_auth_mongo | etc/plugins/emqx_auth_mongo.conf | MongoDB 认证/访问控制 |
| emqx_auth_mysql | etc/plugins/emqx_auth_mysql.conf | MySQL 认证/访问控制 |
| emqx_auth_pgsql | etc/plugins/emqx_auth_pgsql.conf | PostgreSQL 认证/访问控制 |
| emqx_auth_redis | etc/plugins/emqx_auth_redis.conf | Redis 认证/访问控制 |
| emqx_psk_file | etc/plugins/emqx_psk_file.conf | PSK 支持 |
| emqx_web_hook | etc/plugins/emqx_web_hook.conf | Web Hook 插件 |
| emqx_lua_hook | etc/plugins/emqx_lua_hook.conf | Lua Hook 插件 |
| emqx_retainer | etc/plugins/emqx_retainer.conf | Retain 消息存储模块 |
| emqx_rule_engine | etc/plugins/emqx_rule_engine.conf | 规则引擎 |
| emqx_bridge_mqtt | etc/plugins/emqx_bridge_mqtt.conf | MQTT 消息桥接插件 |
| emqx_delayed_publish | etc/plugins/emqx_delayed_publish.conf | 客户端延时发布消息支持 |
| emqx_coap | etc/plugins/emqx_coap.conf | CoAP 协议支持 |
| emqx_lwm2m | etc/plugins/emqx_lwm2m.conf | LwM2M 协议支持 |
| emqx_sn | etc/plugins/emqx_sn.conf | MQTT-SN 协议支持 |
| emqx_stomp | etc/plugins/emqx_stomp.conf | Stomp 协议支持 |
| emqx_recon | etc/plugins/emqx_recon.conf | Recon 性能调试 |
| emqx_reloader | etc/plugins/emqx_reloader.conf | Reloader 代码热加载插件 |
| emqx_plugin_template | etc/plugins/emqx_plugin_template.conf | 插件开发模版 |
上面是官方插件,这些插件基本上能满足我们常见的使用场景,比如客户端认证我们用Mysql,数据存储我们用MongoDB,关于插件的使用和安装请看这里:https://docs.emqx.io/broker/v3/cn/plugins.html。
3. 插件开发
但是有时候可能我们的业务比较特殊,官方的插件不能满足需求,此时需要自定义插件,接下来我们讲一下自定义插件开发流程。
工欲善其事必先利其器,我们先准备一下环境。
1.安装Rebar3
关于Rebar的安装,之前的博文里面就有提到,请自行阅读,或者查看官网文档:http://www.rebar3.org/
2.安装Rebar3插件
开发者需要自定义插件时,可以查看该插件的代码和结构,以更快地开发一个标准的 EMQ X 插件。插件实际是一个普通的 Erlang Application,详情看这里:https://docs.emqx.io/broker/v3/cn/plugins.html#emq-x-r3-2, EMQX官方为我们提供了一个模板,可以通过rebar3的命令行才实现快速构建一个插件。
接下来我们安装插件,注意,在Linux或者Macos下可以用此教程,Windows下稍有不同:
mkdir -p ~/.config/rebar3/templates
git clone https://github.com/emqx/rebar3_emqx_plugin ~/.config/rebar3/templates
3. 新建插件
rebar3 new emqx-plugin <plugin-name> 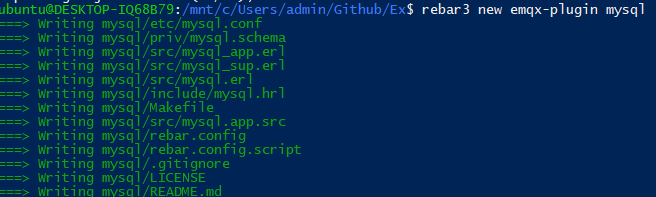
4. 注册插件
- clone emqx-rel 项目:
git clone https://github.com/emqx/emqx-rel.git- rebar.config 添加依赖:
{deps,
   [
   {plugin_name【刚才我们新建的是Mysql】, {git, "你的插件的git地址", {tag, "一般为git发布的版本号"}}},
   ....
   ]
}
这里有个地方注意一下:如果你用的GitHub,请首先发布一个release版本,否则rebar3会提示找不到tag。
- rebar.config 中 relx 段落添加:
{relx,
    [...
    , ...
    , {release, {emqx, git_describe},
       [
         {plugin_name【刚才我们新建的是Mysql】, load},
       ]
      }
    ]
}最后,附上我做的一个DemoPlugin的地址,大家可以自己查看:https://github.com/wwhai/first_plugin.git
5. 编译emqx
cd emqx-rel && make
cd _build/emqx/rel/emqx
./bin/emqx console
上面讲的是最简单的插件配置和生成,在后续过程中,会继续更新插件开发教程,敬请关注!
本博客所有文章除特别声明外,均采用 CC BY-SA 4.0 协议 ,转载请注明出处!